Tint Car Headlights refers to the process of applying a semi-transparent film or coating on car headlights to alter their appearance or improve functionality. This modification is typically done for aesthetic reasons, allowing vehicle owners to customize the color and style of their headlights while maintaining adequate light output for safe driving.
How To Tint Car Headlights? If you’ve ever wondered about transforming the look of your car’s headlights, this guide is your key to achieving a sleek and personalized appearance. Learn the step-by-step process of tinting car headlights, from selecting the right materials to ensuring a smooth and durable application.
Tint Car Headlights? Enhance the visual appeal of your vehicle while adding a touch of individuality with Tint Car Headlights. This popular automotive customization method not only allows you to express your style but also provides an extra layer of protection to your headlights.
How To Tint Smoke Headlights Using Vinyl Overlays
Transforming your car’s appearance is easy by tinting headlights with vinyl overlays. Start by cleaning headlights thoroughly, ensuring a smooth surface. Next, measure and cut the vinyl sheet to fit each headlight precisely. Carefully apply the overlay, smoothing out any air bubbles for a sleek finish.
Tinting car headlights enhances style and offers a personal touch. If you’re wondering how much are tinted windows for cars begin by gathering necessary materials like vinyl overlays and cleaning supplies. Follow step-by-step instructions, and within no time, you’ll achieve a custom tint for your car headlights, boosting both aesthetics and individuality.
Tools You Need
To tint car headlights, gather the necessary tools: tint film, a heat gun, a squeegee, and a utility knife. Begin by cleaning the headlights thoroughly to ensure a smooth application. Next, cut the tint film to fit the headlights, leaving a slight overlap.
Use the heat gun to soften the film, making it easier to conform to the shape of the headlights. Carefully apply the tint, using the squeegee to remove any air bubbles. Trim excess film with a utility knife, and voilà you’ve tinted your car headlights for a sleek and stylish look!
- Tint film
- Heat gun
- Squeegee
- Utility knife
Installation Tips
Looking to tint your car headlights? Start by cleaning the headlights thoroughly with a mild soap and water solution. Ensure they are dry before beginning the tinting process. Next, choose a high-quality tint film designed for headlights.
Measure and cut the film according to the headlight size. Carefully apply the film, smoothing out any bubbles or wrinkles with a squeegee. Trim excess film, and you’re done! Remember, patience is key for a smooth and professional-looking tint job.
Follow these simple steps, and you’ll have stylish, tinted headlights that enhance the appearance of your car while maintaining optimal visibility on the road.
Step By Step Procedure
Tinting car headlights is a simple process that enhances the appearance of your vehicle. First, gather the necessary materials: tint film, a spray bottle with soapy water, a squeegee, and a heat gun.
Next, clean the headlights thoroughly and cut the tint film to fit each headlight. Spray the surface with soapy water, apply the tint, and use the squeegee to remove air bubbles. Finally, use a heat gun to smooth out the tint and ensure a secure fit. With these easy steps, you can give your car a sleek and customized look.
- Preparation And Cleaning
To tint car headlights effectively, start by thoroughly cleaning the headlights with a mild detergent and water. Ensure the surfaces are dry and free from dust or debris before proceeding. This manual touch is crucial for a flawless tint application.
- Spray And Lubricate Lenses
Next, use a specialized headlight tint spray, applying it evenly on the lens surface. To avoid streaks or bubbles, maintain a consistent distance while spraying. Lubricate the lenses to facilitate proper tint placement, allowing for easy adjustments.
- Remove Liner
Carefully peel off the tint liner, ensuring it doesn’t stick to itself. This step requires precision to avoid any creases or uneven application. Gently align the tint with the headlight contours, smoothing out any air bubbles as you go.
- Align And Apply Tint
Place the tint film on a clean surface. Smooth out any wrinkles using a squeegee. Align the tint with the car window carefully. Apply the tint, pressing out air bubbles with the squeegee.
- Squeegee On Tints
Hold the squeegee at a 45-degree angle. Start from the center and move outward. Use steady, even pressure to avoid creases. Repeat until the tint adheres smoothly.
- Use Heat To Smooth Out Curved And Difficult Areas
When tackling challenging curves or tricky spots, employing heat is key. Gently warm the surface with a heat gun or hairdryer, making it pliable. This technique eases the application, ensuring a smoother result on those hard-to-reach areas.
- Trim Away Excess
After applying the tint, trim away any excess material. Use precision and care, following the contours of the headlights. This step guarantees a neat and polished finish, enhancing both the appearance and functionality of your car’s headlights.
How To Tint Headlights (Tint Film Or Tint Spray)
Tinting car headlights can enhance their appearance. You have two options: tint film or tint spray.
To use tint film, clean the headlights thoroughly and cut the film to fit. Apply it smoothly, removing any bubbles. Alternatively, with tint spray, mask the surrounding areas, and apply even coats for a uniform finish.
Choose the method that suits you best and enjoy the transformed look of your car headlights.
Here’s a detailed table summarizing the steps for tinting car headlights using tint film and tint spray.
| Steps | Tint Film Method | Tint Spray Method |
| 1. Preparation | Clean the headlights thoroughly. | Mask the surrounding areas to protect from overspray. |
| 2. Cutting | Cut the tint film to fit the headlights. | No cutting needed; focus on preparing for even spraying. |
| 3. Application | Apply the film smoothly, ensuring no bubbles or wrinkles. | Apply even coats of tint spray for a uniform finish. |
| 4. Final Touch | Smooth out any remaining bubbles or imperfections. | Allow the tint to dry completely for a professional look. |
| 5. Enjoy the Results | Admire the enhanced appearance of tinted headlights. | Revel in the transformed look of your car headlights. |
Choose the method that best suits your preferences and enjoy the upgraded aesthetic of your car.
Choose Between A Vinyl Wrap Or Spray Tint
Deciding between a vinyl wrap and spray tint for your car? Consider the vinyl wrap for a removable option with various designs. Opt for spray tint if you prefer a permanent, sleek finish that seamlessly blends with your car’s headlights.
When tinting car headlights, start by cleaning them thoroughly. Apply the chosen tint method evenly, ensuring a smooth and clear outcome. Remember, a vinyl wrap allows flexibility, while spray tint provides a durable, integrated look for your vehicle’s headlights.
Here’s a detailed table summarizing the steps for tinting car headlights using Vinyl Wrap and tint spray.
| Aspect | Vinyl Wrap | Spray Tint |
| Application Method | Applied as a removable wrap | Applied as a permanent tint |
| Design Options | Offers various designs | Provides a sleek, integrated look |
| Flexibility | Highly flexible and removable | Provides a durable, permanent finish |
| Integration with Headlights | Wraps around headlights | Bonds with headlights for a seamless look |
| Removability | Easily removable | Permanent application |
| Cleaning Process | Requires careful cleaning | Clean thoroughly before application |
| Recommendation | Ideal for those who like to change designs | Suitable for a long-lasting, integrated appearance |
Consider these factors when deciding between a vinyl wrap and spray tint for your car headlights.
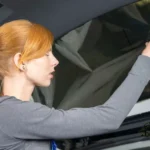
How To Apply Headlight Tint Film
To tint car headlights, start by cleaning them thoroughly with a mild detergent. Dry the headlights completely before applying the tint film. Carefully measure and cut the tint film according to the headlight size, ensuring a precise fit.
Next, peel off the backing of the tint film and gently place it on the headlights. Use a squeegee to remove any air bubbles and smooth out the film for a seamless finish. Trim any excess film and press the edges firmly to secure it. Finally, allow the tint to dry completely before driving.
Applying headlight tint film is a straightforward process that enhances your car’s appearance while providing a sleek, customized look. Follow these simple steps, and you’ll achieve professional-looking results without the need for expert help.
Prepare the Headlights
Begin by cleaning the headlights with a mild detergent and drying them thoroughly. This ensures a clean surface for the tint film to adhere to.
Measure and Cut the Tint Film
Accurately measure the dimensions of your headlights and cut the tint film accordingly. Precision is key to achieving a seamless and professional appearance.
Apply the Tint Film
Peel off the backing of the tint film and carefully place it onto the headlights. Use a squeegee to smooth out the film, removing any air bubbles for a flawless finish.
Trim Excess Film
After applying the tint film, trim any excess material around the edges. This step helps to create a neat and tailored look while ensuring the film stays securely in place.
Press and Secure
Press the edges of the tint film firmly to ensure proper adhesion. This step is crucial for the longevity and effectiveness of the tint.
Allow for Drying
Let the tint film dry completely before driving. This ensures that the film adheres properly and avoids any issues during regular use.
Following these simple steps will guide you through the process of applying headlight tint film, giving your car a customized and stylish appearance.
How To Tint Headlights With Spray
Learn to tint your car headlights using spray in a few simple steps. Begin by cleaning the headlights thoroughly to ensure a smooth application. Apply the tint spray evenly, holding the can at a distance for a professional finish. Follow the instructions on the spray can for drying times, and enjoy a customized look for your car’s headlights.
Tinting car headlights is a straightforward process that can enhance the aesthetic appeal of your vehicle. With the right tools and technique, you can achieve a tinted look that not only adds style but also provides a layer of protection to the headlights. Take the time to do it right, and you’ll have a cost-effective way to personalize your car’s appearance.
Are Tinted Headlights Legal?
Tinted headlights may not be legal in some areas. Check local regulations to ensure compliance. Understanding the rules helps avoid potential legal issues.
If you want tinted headlights, follow specific guidelines. Use approved films, maintain proper brightness, and consider professional installation for the right look while staying within the law. Always prioritize safety and adherence to regulations.
Should You Tint Your Headlights Or Not?
Thinking about tinting your headlights? It’s a decision worth considering for both style and function. Tinted headlights can enhance your car’s appearance and provide better visibility during nighttime drives. Before making a choice, weigh the pros and cons to ensure it aligns with your preferences and local regulations.
Wondering how to tint car headlights? Begin by researching your state’s laws regarding headlight tinting. Once you’re aware of the regulations, gather the necessary materials, such as tint film and application tools. Follow a step-by-step guide or seek professional help to achieve the desired look without violating any rules.
Tinting Or Painting Headlights?
When deciding between tinting or painting headlights, consider your preference for style and functionality. Tinting offers a subtle, translucent look that enhances aesthetics without compromising light output.
On the other hand, painting headlights provides a solid color, creating a bold appearance. To tint car headlights effectively, start by cleaning the headlights thoroughly. Next, apply the tint film evenly, smoothing out any air bubbles for a seamless finish.
Painting headlights involves sanding the surface, applying primer, adding the chosen color, and finishing with a clear coat. Both methods can elevate your car’s look, so choose the one that aligns with your desired outcome and personal style.
Pros Of Tinting Your Headlights
Tinting your headlights has several benefits. Firstly, it enhances the overall appearance of your car, giving it a sleek and customized look. Tinted headlights can reduce glare, improving visibility and safety during nighttime driving.
To tint car headlights, start by cleaning them thoroughly. Next, apply a quality tint film, making sure to smooth out any bubbles or wrinkles. Once applied, the tint protects the headlights from UV rays and adds a layer of durability. Regularly maintaining the tint ensures long-lasting benefits and a stylish touch to your vehicle.
FAQs
Can you put tint on headlights?
Yes, you can tint your headlights to enhance their appearance and improve visibility at night.
How can I tint my headlights at home?
Tinting your headlights at home involves cleaning them thoroughly and applying a quality tint film, ensuring it is free of bubbles or wrinkles.
Can you tint your headlights with spray paint?
Tinting with spray paint is not recommended for headlights, as it may result in uneven coverage and compromise visibility.
How do you film headlights?
Filming headlights involves applying a tint film to the surface, providing a customized look and protection against UV rays.
How to apply headlight tint without a heat gun?
Apply headlight tint without a heat gun by using a hairdryer or warm water to facilitate proper adhesion and smoothing of the film.
Conclusion
In wrapping up the process of tinting car headlights, remember that it’s a straightforward DIY task that can bring both style and practical benefits to your vehicle. By following the simple steps of cleaning, applying, and maintaining the tint film, you not only achieve a customized look but also enhance safety during night drives with reduced glare.
In the end, taking the initiative to tint your car headlights is a small effort that yields significant results. Enjoy the sleek appearance, improved visibility, and the added layer of protection against UV rays. Keep your headlights looking sharp and your driving experience safer with this easy and effective modification.